Getting Started with Meshtastic (915MHz, US)
Meshtastic is a mesh networking project that utilizes affordable, long-range, and low-power radio hardware to create ad-hoc mesh networks. This guide will help you set up Meshtastic on the 915MHz frequency band in the United States.
Hardware Requirements
To get started, you'll need the following:
-
Meshtastic-compatible device: This could include devices like TTGO T-Beam, Heltec LoRa series, and other compatible ESP32 boards with LoRa radios.
-
Antenna: A suitable antenna tuned for 915MHz. They come in many shapes and sizes. For more specific information on antennas visit the antenna reports page.
- USB cable: For powering and programming your device.
Important Note
Never power on your Meshtastic device without an antenna connected. This could permanently damage the radio. Make sure to look into the mistakes to avoid page to avoid common pitfalls.
Software Setup and Flashing the Firmware
- Visit the Meshtastic Web Flasher in your web browser.
- Follow the instructions on the page to select and flash the latest firmware for your specific device.
Initial Setup
- Power on your device.
- Each custom Meshtastic device has their own button combinations. Check out your respective device's documentation.
- Setup communication with device.
- Enable Bluetooth on your device (if not already enabled).
- Or use Wi-Fi if your node has a Wi-Fi chip.
- USB serial using
https://client.meshtastic.org/is another option. Please note that WebSerial is not supported in Firefox or Safari.
Settings Configuration
- Once connected either you will have access to the settings either through the mobile app or the web client.
- For accessing the web interface, navigate to the IP address displayed on the Meshtastic app or use
http://meshtastic.local - Setup basic information:
- Set your device name.
- Choose the correct region (in this case, choose United States for 915MHz).
- Set other preferences such as GPS settings, screen brightness, etc.
- View our recommended settings.
Device Role is an important step for configuring Meshtastic.
- For most nodes, we recommend
Clientrole. This is the "default" role and provides access to all features. Client_Muteis a good choice for additional nodes, especially those in close proximity (e.g. a single home or apartment) or areas with high mesh coverage. These nodes can still send and receive messages but do not participate in routing other nodes' messages. They do not contribute to the mesh, but also do not contribute to the network burden that comes with multiple nodes in a very small area rebroadcasting a single message all at once.RouterorRepeaterroles should only be used for devices that are exceptionally well located with excellent line of sight. Too many routers/repeaters can actually degrade mesh network performance, especially in dense meshes like within Chicago.- Other roles exist for nodes that serve a purpose other than messaging.
- Detailed information on all roles and their usage is available in this Meshtastic blog post and Meshtastic's table on roles
Other Recommended Settings
Mobile Nodes
This is for a node that travels around with you. If you don't see a particular setting listed below, the default is fine.
Device
- Broadcast Node Info Interval:
10800 seconds(3 hours)
Position
- Smart position:
Enabled - GPS:
Enabled - Broadcast Interval:
15 minutesor900 seconds
Power
- Power Saving Mode:
Disabled
LoRa
- Lora Region:
US - Hop Limit:
5(Kentuckiana)7(All of Kentucky) - Ignore MQTT:
Disabled - OK to MQTT:
Enabled - Waveform Settings:
Long Fast - Radio Transmit:
Enabled - Max Transmit Power:
30dBm - Override Duty Cycle:
Enabled - Boosted RX Gain:
Enabled - Boosted RX Gain:
Enabled - Store and Forward:
Disabled
Store and Forward (S&F) Module
- Module Enabled:
Disabled
Fixed Nodes
This is for a node that stays in one place most of the time. If you don't see a particular setting listed below, the default is fine.
Device
- Broadcast Node Info Interval:
10800 seconds(3 hours)
Position
- Smart position:
Disabled - GPS:
Enabled - Broadcast Interval:
12 hoursor43200 seconds
Power
- Power Saving Mode:
- If plugged into the wall:
Disabled - If running off solar,
Enabled
- If plugged into the wall:
LoRa
- Lora Region:
US - Hop Limit:
5(Kentuckiana)7(All of Kentucky) - Ignore MQTT:
Enabled - OK to MQTT:
Enabled - Waveform Settings:
Long Fast - Radio Transmit:
Enabled - Max Transmit Power:
30dBm - Override Duty Cycle:
Enabled - Boosted RX Gain:
Enabled - Store and Forward:
Enabled
Store and Forward (S&F) Module
- Module Enabled:
Enabled - Heartbeat:
Enabled - Number of Records:
100 - History Return Max:
100 - History Return Window:
7200 seconds(2 hours) - Update Interval:
900 seconds(15 minutes)
Setting up MQTT for your node
What is MQTT?
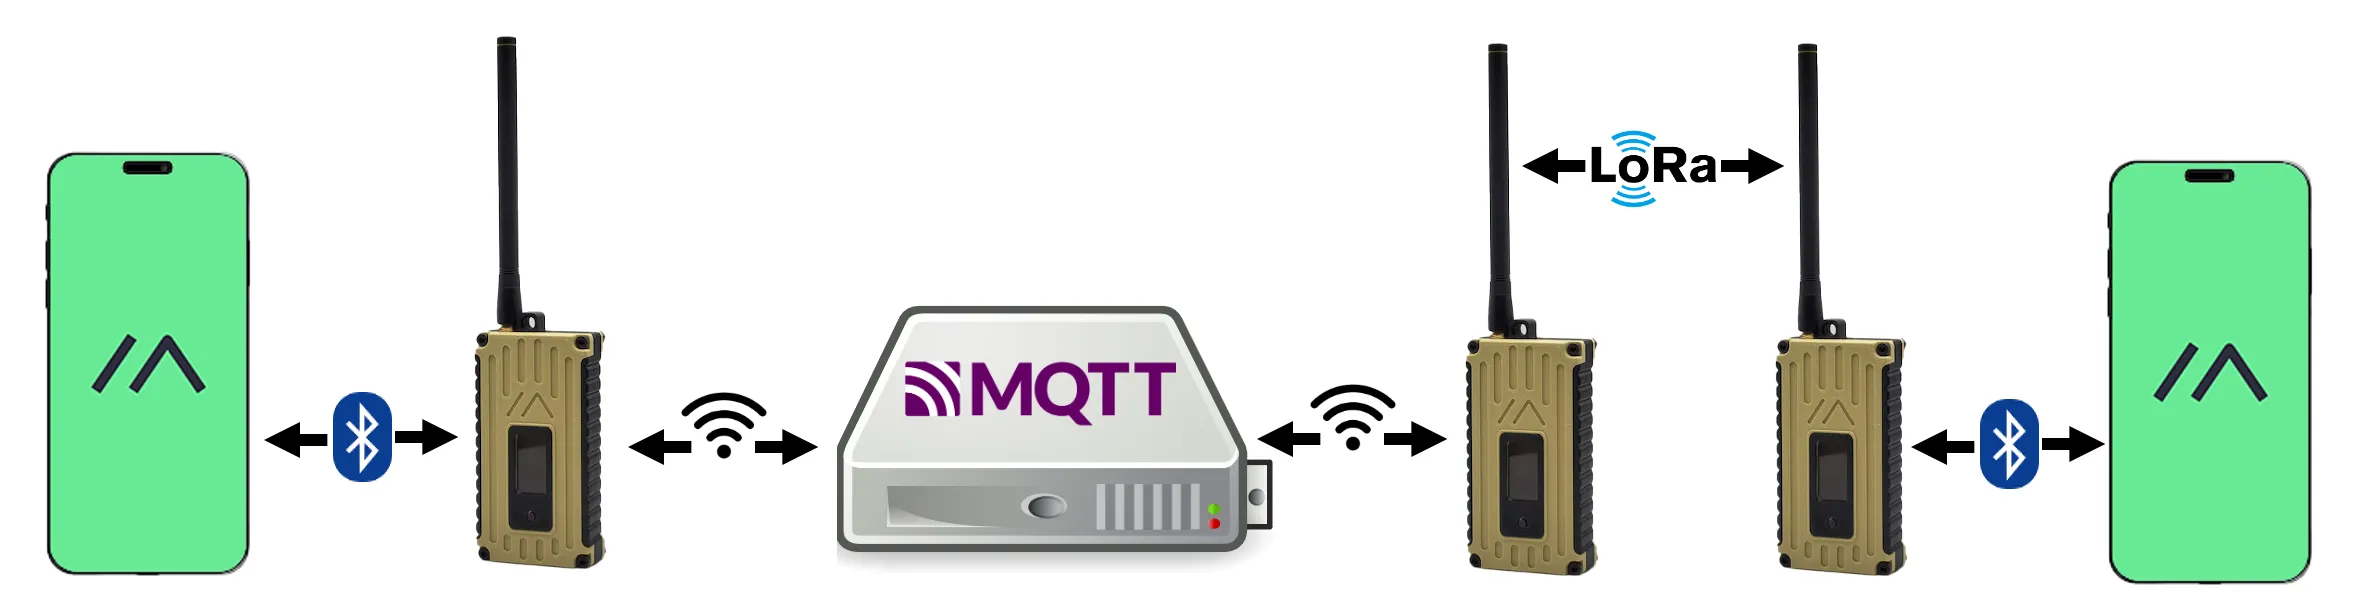
MQTT stands for Message Queuing Telemetry Transport. It is a protocol that has been integrated into Meshtastic to allow nodes to relay messages over the internet. This allows nodes to bridge where physically they couldn't have.
MQTT Settings
Enabling MQTT will allow you to appear on Liam Cottle MeshMap and Global MeshMap.
- Go to your MQTT settings and select enable.
- Use
kymeshmqtt.ddns.netfor MQTT server address - Use
kymeshfor MQTT username - Use
st5jS@e7uLfor MQTT password - Enable MQTT encryption
- Make sure JSON and TLS are disabled
-
Set your root topic to
msh/US/KYNote
Root topic input is case sensitive, also make sure not to leave a space before or after the root topic input.
-
If you are using Wi-Fi, set Proxy to Client off, if you are using a phone, turn on Proxy to Client
-
Go to channel settings and then primary channel
- Set the pre-Shared key to
AQ== - Leave the name blank
- Enable MQTT uplink and disable downlink
- This is set to send messages recieved to MQTT but prevents your node from getting messages from MQTT. Read more about this in the optional settings.
- Enable Map Reporting, set Map Publish Interval to 1 hour and set your desired Position Precision
Optional Settings
- If you are using a mobile device, Make sure to enable Connect to mesh
- The uplink and downlink settings can be changed to your preference if you want to contact others through MQTT. These instructions were created for the standard set by us
- We recommend having at least uplink enabled on the primary channel and device position enabled so you get on Liam Cottle MeshMap and Global MeshMap.
Legal Considerations
- Meshtastic operates in the 915MHz ISM band under FCC regulations in the United States.
- Meshtastic does not require a HAM radio license to operate, but obtaining one is optional and may provide additional privileges and knowledge of radio regulations.
- All communications on Meshtastic are encrypted, ensuring privacy and security of messages within the mesh network.